Hello everyone!
Á íslensku neðar
I want to talk about hand and nail care! Personally I think you can tell a lot about a person by the way their hands look. Usually you won’t find me with naked nails. I always wear nail polish and it really depends on the season what colour range I go for. At the moment I’m longing for warm summer days. In the summer you can pull off wearing the whole range of colours and glitters. The thing about nail polishes is that they chip up way to quick and if you are like me it’s impossible to have cracks or half chipped nail polish. If I wear just plain old polish it lasts about 2-3 days until it cracks up, even with base and top coats.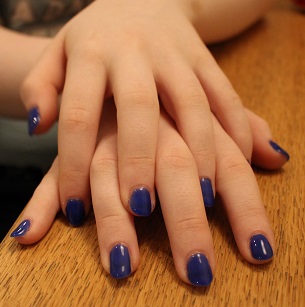
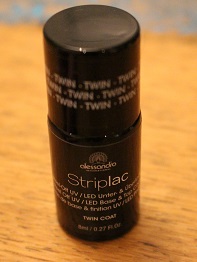
So I started a hunt for the ultimate nail polish that lasts and doesn’t chip off. For a while I thought it would be impossible and tried brand after brand and it was always the same story. Then I discovered Gel nail polish. I went for a manicure at the local beauty parlour. They offered a free try for the Alessandro Gel Lac. So I thought to myself, why not try it? It’s amazing! The whole thing took about 30 minutes and lasted 10 days without cracking or chipping at all!  The colour was so vibrant and pretty. And they have a range of over 40 colours. What makes this different from other gel polishes is that this one peels of and leaves the nails in good condition. In my experience other gel polishes might stay on for over a week but it’s a nightmare to get them off and they leave the nails brittle and thin as paper. I got a starter kit and a UV light and want to show you how it’s done and the end result. I blurred out the brand of my UV lamp because it’s not the official Alessandro gel lac UV light lamp. So I thought I’d show you how to do it and the results. I offered my sister a manicure and took some pictures for you all.
 Step 1 : I start by taking a nail file and filing the nails down and shaping them, I do the top as well with a really fine file just to get the excess oils off so the polish stays on. Then I use normal hand sanitizing alcohol and rub on the nails.
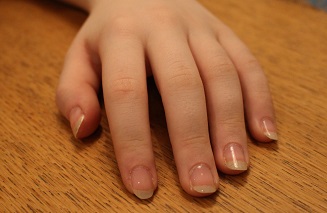
Step 2: is base coat. When putting the gel lac on, be careful to not go on the skin. Then you might end up with air underneath the polishs and it will come off. I do the first four nails and leave the thumbs for last. Then i place them in the UV  light and let it harden for about 1 minute. I then do the other hand and end by doing the thumbs. However if you are not very quick it can run a bit so if you want them perfect it might be better to just do two at a time.
Step 3 : The colour. I chose a deep. Again you just paint the first four and save the thumbs for last. The colour only has to be in the light for 30 seconds.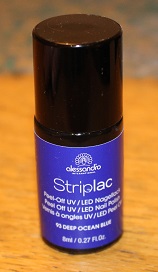
Step 4 : The second coat of colour. Exacly like step 3
 Step 5 : I chose a base coat that also works as a top coat. Paint over the color with the top coat and in the UV light for 1 minute.
Step 6 : I take the rubbing alcohol and cotton and rub the alcohol on the nails to take residue color and to clean the stickyness off. Now the polish is hard and i‘m are ready to go and be fabulous. And remember to moisturize!!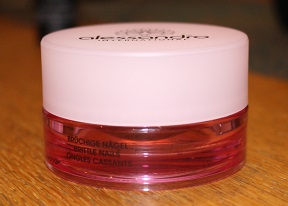
Then when i‘m sick of the colour and want it off i just dip my hands in warm water for a couple of minutes and peel it off! This will last for about 10-14 days. I love it, but i need a bigger colour range. This is a great alternative for when you are traveling and don‘t have the time to do touch ups when the polish starts chipping. Feel free to contact me if you want to try it or buy your own starterkit, i can refer you to the places that sell this. You can also contact me if you want to chat about the product or your own experience of it.
♥
Halló allir!
Ég vil tala um handa og naglaumhirðu! Persónulega held ég að maður geti komist að ansi miklu um fólk með því að sjá á þeim hendurnar. Sjálf fer ég varla út úr húsi án þess að vera með lakkaðar neglur og það er árstíðarbundið hvaða litir verða fyrir valinu. Þessa dagana þrái ég hlýja sumar daga en þá getur maður dregið fram áberandi og sterka liti og auðvitað glimmer. En þar sem að ég er hálfgerður naglalakkafíkill þá berst ég við að halda naglalakkinu fallegu sem lengst. Það er alveg ómögulegt að fara út úr húsi með gamalt og ljótt naglalakk þar sem vantar jafnvel á eina eða tvær neglur. Þegar ég er með venjulegt naglalakk og jafnvel góðan grunn og yfirlakk þá er naglalakkið samt bara að endast í um 2-3 daga áður en það fer að brotna upp úr því.
Þannig hófst leitin að naglalakki sem endist fallegt og fer vel með neglurnar. Um tíma hélt ég að þetta yrði aldrei að veruleika, prufaði tegund eftir tegund og allt var þetta eins. Svo sá ég auglýsingu á snyrtistofu nálægt mér. Þar var verið að bjóða uppá ókeypis prufu af handsnyrtingu með Alessandro gel lac. Þannig að auðvitað fór ég og prufaði, hafði engu að tapa. Þetta naglalakk er æðislegt. Í heildina tók handsnyrtingin og lökkun um 30 minútur og entist í 10 daga og það sást ekki á því! Allir litirnir eru svo bjartir og fallegir og í heildina eru þeir með yfir 40 liti í þessari línu. Munurinn á þessu gel lakki og öðrum er það að þetta er svokallað „peel off“ þannið að þú flettir lakkinu af og undir er nöglin heilbrigð og falleg undir. Önnur gellök sem ég hef prufað hafa líka enst í svipaðan tíma en þegar er komið að því að taka það af er það alger martröð. Mikið af acingtoni og naglaþjalir og þegar að þetta loksins losnar af eru neglunar brotnar, rifnar og eins og pappír. Eftir að prufa þetta lakk frá Alessandro, fékk ég mér byrjendapakka fyrir gel lakk. Lökk, pinna og lampa. Ég fékk yngri systur mína í lið með mér og ætla að sýna ykkur hvernig maður getur gert svona heima og hvernig þetta lítur út. Ég strokaði yfir merkið sem lampinn er frá því þetta er ekki lampinn frá Alessandro.
Skref 1 : Ég byrja á því að taka naglaþjöl og pússa neglurnar og móta þær. Ég pússa þær létt ofaná líka til að ná burt húðfitunni svo að lakkið tolli á sem lengst. Síðan nota ég handspritt í grisju eða bómul og nudda burt allt ryk.
Skref 2 : Er lakkgrunnur. Alessandro gefur út grunn og yfirlakk sem eitt lakk, glært og háglansandi. Þegar ég nota svona lakk reyni ég að passa mig að lakkið fari ekki á húðina því það getur hleypt lofti undir og þá getur lakkið losnað af. Ég byrja á að taka fjórar neglur og geri síðan þumlana síðast. Það þarf að hafa í huga að þar sem að lakkið harnar ekki fyrr en það fer inn í lampann gæti það runnið aðeins til þannig að ef þær eiga að vera fullkomnar gæti verið betra að taka bara tvær í einu. Glæruna þarf að hafa inní lampa í 1 mínútu og þá er hún orðin hörð
Skref 3 : Liturinn. Ég tek fingurna í sömu röð og með glæruna og passa að hafa ekki of þunnt lag til að liturinn verði sem sterkastur. Litinn hef ég inní lampanum í 30 sek.
Skref 4 : Önnur umferð af lit, alveg eins og skref 3
Skref 5 : Síðan er það glæra yfir aftur og hafa inní lampanum í 1 min.
Skref 6 : Setja smá handspritt í grisju eða bómul og nudda neglurnar þar sem þær eru ansi klístraðar. Síðan nota ég alltaf handáburð eða naglakrem og þá er ég tilbúin! Þetta ætti að endast í um það bil 10 daga.
Síðan þegar ég tek lakkið af dýfi ég fingrunum í volgt vatn í nokkrar mínútur og fletti því síðan af.!
Þetta virðist kannski vera smá vesen en ég er með naglalakk uppá hvern dag og nenni hreinlega ekki að þrífa og lakka upp á nýtt á þriggja daga fresti. Sérstaklega ef ég er að fara í ferðalag eða hef ekki tíma eða möguleika til að vera að lagfæra þá er þetta klárlega góður kostur. Þið getið haft samband við mig ef þið hafið áhuga á að prufa svona lakk eða kaupa startpakka þá get ég bent ykkur á sölustaði. Eða bara ef þið viljið spjalla eða segja frá ykkar reynslu af þessu lakki.
♥

This is such a gorgeous nail polish colour! ❤
LikeLiked by 1 person
Thanks! I think it goes with almost anything, whether you’re at the beach tanning or making a snowman ^^
LikeLiked by 1 person